This website offer some workarounds for you to maximize the use of your iContact Email Marketing software. Please bear in mind that iContact has a built-in knowledge base that may contain more updated information. You may want to check it from time to time if you haven't done so. You should find it on the upper right part (near) where your drop down menu is located. This is represented by "01" in the screenshot above.

Monday, March 31, 2014

Social Tab


Social media platforms such as Facebook, Twitter, and LinkedIn are the talk about nowadays. Used correctly, these social media platforms are powerful tool in promoting whatever you got from your "emo status updates" to your "serious money-making business". Imagine, you can reach out to possible prospects from any place in the world with these social media platforms without spending a penny to travel to their place. Facebook, Twitter, LinkedIn would just deliver your email message / newsletter right in the room where their computers are located.


iContact has a built-in module that allow you to post the advertisements, flyers, email messages, newsletters you have created. In a perfect scenario, you don't need to log on to your social media platforms to post update(s) to your Facebook, Twitter, and LinkedIn accounts. Once your social media accounts are integrated with your iContact, you only need to go to your iContact Email Marketing software's "Social Media" page to do all these.

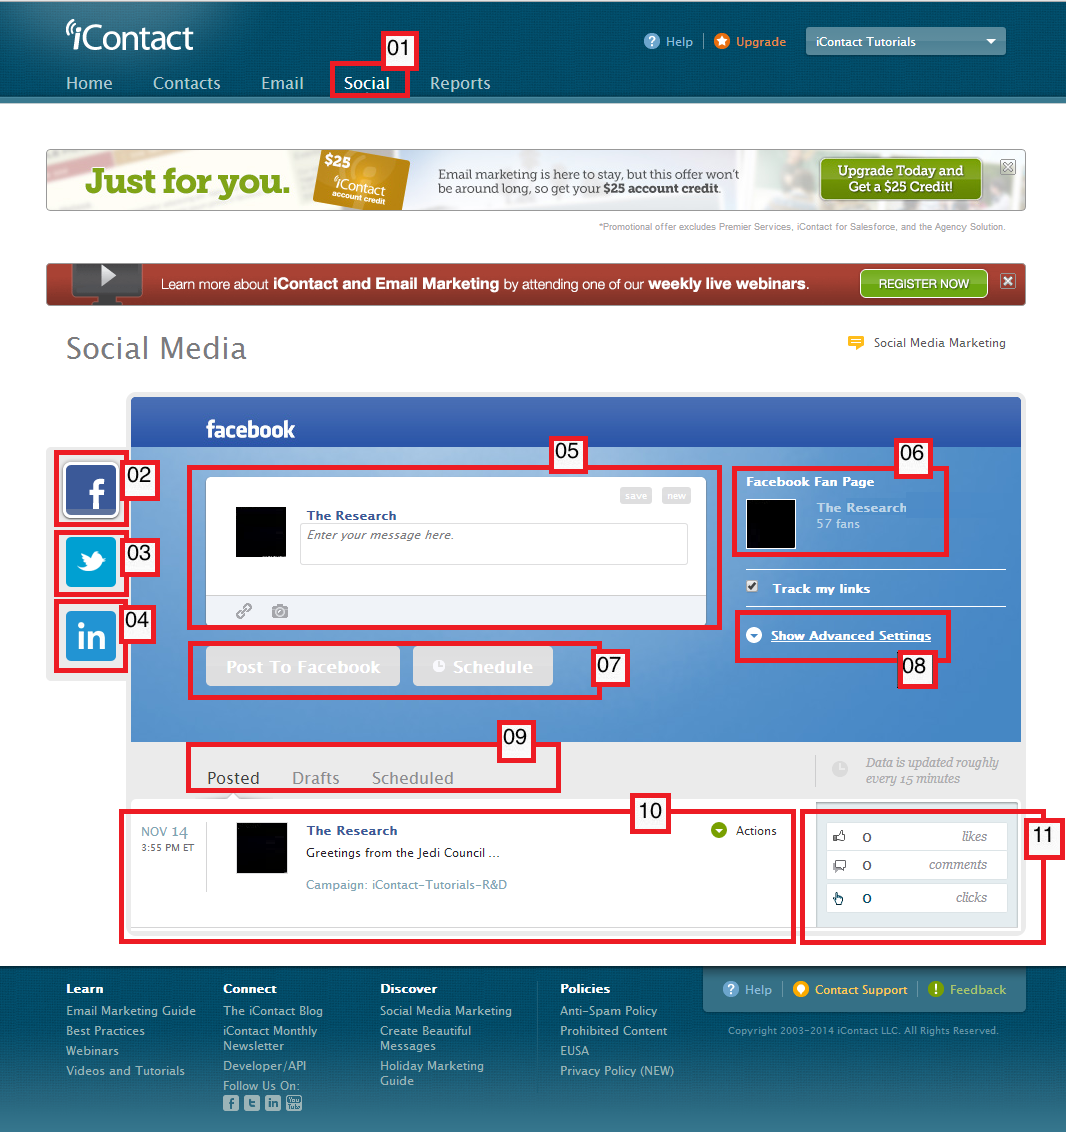
Below is an overview of what you can expect in your iContact Email Marketing software's "Social Media" page.

01. The "Social Media" page can be accessed by simply clicking on the "Social" tab of your iContact Email Marketing software. The "Social" tab can be seen on the upper part along with the other tabs such as "Home", "Contacts", "Email", and "Reports".
02. A Facebook logo will be shown here. If you click this Facebook logo, it should allow you to choose the Facebook page you intend to post your updates.
03. The Twitter icon is located just below the Facebook icon. Clicking on this Twitter icon should also allow you to choose the Twitter page you want to post your updates.
04. The LinkedIn icon should be found just below the Twitter icon, which should have the same purpose like the two above-mentioned social media icons.
05. Each of these social media icons will have a corresponding text box where you can type in whatever updates you want to show your Facebook, Twitter, or LinkedIn contacts.
06. Just beside the above-mentioned text box, there will be an indicator that shows you a quick glance on which social media page will show the updates that you will be posting.
07. There will be two buttons below the text box where you type in your updates, one button should allow you to post your updates immediately and the other one should allow you to schedule your social media post(s) on the date and time of your choice.
08. The "Show Advanced Settings" on the other hand allows you to choose the campaign for categorizing the post.
09. "Posted", "Drafts", and "Scheduled". These will classify your updates if you have chosen to post them immediately, or scheduled them, and so on.
10. Your updates, post or not posted, will be shown on each respective categories. Be it "Posted", "Drafts", or "Scheduled".
11. This will only be visible for Facebook updates posts as it will show the number of "Facebook Likes" you got, the umber of comments on your post(s), or if someone even bother to click on your Facebook post(s).


Your iContact Email Marketing software's "Social" tab works alongside with your iContact Email Marketing software's "Social Media Settings" page. This is the one the you access by clicking on the upper right part (where a small arrow icon is pointing downwards), to reveal a drop down menu, then choosing the "Social Media Settings" option.


Friday, March 28, 2014

Contents


The Five Main iContact Tabs


Usual iContact Feature


Usual iContact How-To


Workarounds


Others

Thursday, March 27, 2014

Add Contacts


Now we go to your "Add Contacts to My Lists" page. This portion of your iContact allows you to choose among options on how you can add your contact(s) in your list(s). It also allow you to access the page where you can create your sign-up forms.


01. To go to the "Add Contacts to My Lists" page you must first click on the "Contacts" tab, which should take you to the "Contacts" tab page. A dark blue bar should also appear just below the "Contacts" tab that you just clicked, and should give you more options; "Lists", "Add Contacts", "Browse Contacts", "Search Contacts", "Segments", "Sign-up Forms"
02. The "Add Contacts" option is the one that you need to click next.
03. This option brings you to your "Create or Edit Sign-up Forms" page, where you can begin building your sign-up form.
04. The "Add Contacts from a File" option should bring you to a page that will allow you to upload or import the email addresses of your contacts through supported files.
05. The "Add Contacts One by One" is another option to upload or import contacts to your iContact Email Marketing software.
06. Another interesting feature is the "Copy & Paste Contacts". It allows you to just copy multiple email address from a source and paste them all on the text box from this page.


Privacy Policy For iContact Tutorials

This website (http://icontact-tutorials.blogspot.com/) collects some Personal Data from its Users.


Data Controller and Owner
iContact-Tutorials,
moronic.softwares@gmail.com


Rights
iContact-Tutorials is written and maintained by Erickson D. Contents may not be copied to another website without the permission of Erickson D. Information in this website may be used for reference purposes only. Further, all screenshots are owned by Erickson D unless otherwise indicated.


Association with iContact or Vocus
iContact-Tutorials is a third-party website and is not affiliated with iContact (http://www.icontact.com/) or Vocus (http://www.vocus.com/) in any way.


Types of Data collected
Among the types of Personal Data that this website collects, by itself or through third parties, there are: Cookie and Usage Data.
Other Personal Data collected may be described in other sections of this privacy policy or by dedicated explanation text contextually with the Data collection.
The Personal Data may be freely provided by the User, or collected automatically when using this website.
Any use of Cookies - or of other tracking tools - by this website or by the owners of third party services used by this website, unless stated otherwise, serves to identify Users and remember their preferences, for the sole purpose of providing the service required by the User.
Failure to provide certain Personal Data may make it impossible for this website to provide its services.
The User assumes responsibility for the Personal Data of third parties published or shared through this website and declares to have the right to communicate or broadcast them, thus relieving the Data Controller of all responsibility.


Mode and place of processing the Data

Method of processing
The Data Controller processes the Data of Users in proper manner and shall take appropriate security measures to prevent unauthorized access, disclosure, modification or unauthorized destruction of the Data.
The Data processing is carried out using computers and/or IT enabled tools, following organizational procedures and modes strictly related to the purposes indicated. In addition to the Data Controller, in some cases, the Data may be accessible to certain types of persons in charge, involved with the operation of the site (administration, sales, marketing, legal, system administration) or external parties (such as third party technical service providers, mail carriers, hosting providers, IT companies, communications agencies) appointed, if necessary, as Data Processors by the Owner. The updated list of these parties may be requested from the Data Controller at any time.

Place
The Data is processed at the Data Controller's operating offices and in any other places where the parties involved with the processing are located. For further information, please contact the Data Controller.

Conservation Time
The Data is kept for the time necessary to provide the service requested by the User, or stated by the purposes outlined in this document, and the User can always request the Data Controller for their suspension or removal.


The use of the collected Data
The Data concerning the User is collected to allow the website to provide its services, as well as for the following purposes: Analytics and Interaction with external social networks and platforms.
The Personal Data used for each purpose is outlined in the specific sections of this document.


Detailed information on the processing of Personal Data
Personal Data is collected for the following purposes and using the following services:

Analytics
The services contained in this section enable the Owner to monitor and analyze web traffic and can be used to keep track of User behavior.

Alexa Metrics (Alexa Internet, Inc.)
Alexa Metrics is an analytics service provided by Alexa Internet, Inc.
Personal Data collected: Cookie and Usage Data.
Place of processing: USA – Privacy Policy

Google Analytics (Google)
Google Analytics is a web analysis service provided by Google Inc. (“Google”). Google utilizes the Data collected to track and examine the use of this website, to prepare reports on its activities and share them with other Google services.
Google may use the Data collected to contextualize and personalize the ads of its own advertising network.
Personal Data collected: Cookie and Usage Data.
Place of processing: USA – Privacy PolicyOpt Out

Google Analytics with anonymized IP (Google)
Google Analytics is a web analysis service provided by Google Inc. (“Google”). Google utilizes the Data collected to track and examine the use of this website, to prepare reports on its activities and share them with other Google services.
Google may use the Data collected to contextualize and personalize the ads of its own advertising network.
This integration of Google Analytics anonymizes your IP address. It works by shortening Users' IP addresses within Member States of the European Union or in other Contracting States to the Agreement on the European Economic Area. Only in exceptional cases will the complete IP address be sent to a Google server and shortened within the USA.
Personal Data collected: Cookie and Usage Data.
Place of processing: USA – Privacy PolicyOpt Out

Interaction with external social networks and platforms
These services allow interaction with social networks or other external platforms directly from the pages of this website.
The interaction and information obtained by this website are always subject to the User’s privacy settings for each social network.
If a service enabling interaction with social networks is installed it may still collect traffic data for the pages where the service is installed, even when Users do not use it.

Google Friend Connect (Google)
Google Friend Connect is a social interaction service provided by Google Inc.
Personal Data collected: Cookie and Usage Data.
Place of processing: USA – Privacy Policy


The privacy of our visitors to http://icontact-tutorials.blogspot.com/ is important to us.

At http://icontact-tutorials.blogspot.com/, we recognize that privacy of your personal information is important. Here is information on what types of personal information we receive and collect when you use and visit http://icontact-tutorials.blogspot.com/, and how we safeguard your information. We never sell your personal information to third parties.

Log Files
As with most other websites, we collect and use the data contained in log files. The information in the log files include your IP (internet protocol) address, your ISP (internet service provider, such as AOL or Shaw Cable), the browser you used to visit our site (such as Internet Explorer or Firefox), the time you visited our site and which pages you visited throughout our site.

Cookies and Web Beacons
We do use cookies to store information, such as your personal preferences when you visit our site. This could include only showing you a popup once in your visit, or the ability to login to some of our features, such as forums.

We also use third party advertisements to support our site. Some of these advertisers may use technology such as cookies and web beacons when they advertise on our site, which will also send these advertisers (such as Google through the Google AdSense program) information including your IP address, your ISP , the browser you used to visit our site, and in some cases, whether you have Flash installed. This is generally used for geotargeting purposes (showing New York real estate ads to someone in New York, for example) or showing certain ads based on specific sites visited (such as showing cooking ads to someone who frequents cooking sites).

DoubleClick DART cookies
We also may use DART cookies for ad serving through Google’s DoubleClick, which places a cookie on your computer when you are browsing the web and visit a site using DoubleClick advertising (including some Google AdSense advertisements). This cookie is used to serve ads specific to you and your interests (”interest based targeting”). The ads served will be targeted based on your previous browsing history (For example, if you have been viewing sites about visiting Las Vegas, you may see Las Vegas hotel advertisements when viewing a non-related site, such as on a site about hockey). DART uses “non personally identifiable information”. It does NOT track personal information about you, such as your name, email address, physical address, telephone number, social security numbers, bank account numbers or credit card numbers. You can opt-out of this ad serving on all sites using this advertising by visiting http://www.doubleclick.com/privacy/dart_adserving.aspx

You can chose to disable or selectively turn off our cookies or third-party cookies in your browser settings, or by managing preferences in programs such as Norton Internet Security. However, this can affect how you are able to interact with our site as well as other websites. This could include the inability to login to services or programs, such as logging into forums or accounts.

Deleting cookies does not mean you are permanently opted out of any advertising program. Unless you have settings that disallow cookies, the next time you visit a site running the advertisements, a new cookie will be added.


Additional information about Data collection and processing

Legal Action
The User's Personal Data may be used for legal purposes by the Data Controller, in Court or in the stages leading to possible legal action arising from improper use of this website or the related services.

Additional Information about User's Personal Data
In addition to the information in this privacy policy, this website may provide the User with contextual information concerning particular services or the collection and processing of Personal Data.

System Logs and Maintenance
For operation and maintenance purposes, this website and any third party services may collect files that record interaction with this website (System Logs) or use for this purpose other Personal Data (such as IP Address).
Information not contained in this policy
More details concerning the collection or processing of Personal Data may be requested from the Data Controller at any time at its contact information.

The rights of Users
Users have the right, at any time, to know whether their Personal Data has been stored and can consult the Data Controller to learn about their contents and origin, to verify their accuracy or to ask for them to be supplemented, cancelled, updated or corrected, or for their transformation into anonymous format or to block any data held in violation of the law, as well as to oppose their treatment for any and all legitimate reasons. Requests should be sent to the Data Controller at the contact information set out above.
This website does not support “do not track” requests.
To understand if any of the third party services it uses honor the “do not track” requests, please read their privacy policies.

Changes to this privacy policy
The Data Controller reserves the right to make changes to this privacy policy at any time by giving notice to its Users on this page. It is strongly recommended to check this page often, referring to the date of the last modification listed at the bottom. If a User objects to any of the changes to the Policy, the User must cease using this website and can request the Data Controller to erase the Personal Data. Unless stated otherwise, the then-current privacy policy applies to all Personal Data the Data Controller has about Users.

Information about this privacy policy
The Data Controller is responsible for this privacy policy.


Definitions and legal references

Personal Data (or Data)
Any information regarding a natural person, a legal person, an institution or an association, which is, or can be, identified, even indirectly, by reference to any other information, including a personal identification number.

Usage Data
Information collected automatically from this website (or third party services employed in this website), which can include: the IP addresses or domain names of the computers utilized by the Users who use this website, the URI addresses (Uniform Resource Identifier), the time of the request, the method utilized to submit the request to the server, the size of the file received in response, the numerical code indicating the status of the server's answer (successful outcome, error, etc.), the country of origin, the features of the browser and the operating system utilized by the User, the various time details per visit (e.g., the time spent on each page within the website) and the details about the path followed within the website with special reference to the sequence of pages visited, and other parameters about the device operating system and/or the User's IT environment.

User
The individual using this website, which must coincide with or be authorized by the Data Subject, to whom the Personal Data refer.

Data Subject
The legal or natural person to whom the Personal Data refers to.

Data Processor
The natural person, legal person, public administration or any other body, association or organization authorized by the Data Controller to process the Personal Data in compliance with this privacy policy.

Data Controller (or website Owner, or Owner)
The natural person, legal person, public administration or any other body, association or organization with the right, also jointly with another Data Controller, to make decisions regarding the purposes, and the methods of processing of Personal Data and the means used, including the security measures concerning the operation and use of this website. The Data Controller, unless otherwise specified, is the Owner of this website.

This website
The hardware or software tool by which the User Personal Data is collected.

Cookie
Small piece of data stored in the User's device.

Legal information
Notice to European Users: this privacy statement has been prepared in fulfillment of the obligations under Art. 10 of EC Directive n. 95/46/EC, and under the provisions of Directive 2002/58/EC, as revised by Directive 2009/136/EC, on the subject of Cookies.

This privacy policy is solely about this website.


Latest update: March 26, 2014


Monday, March 24, 2014

Lists


The "My Lists" page shows you the name of your list(s), and a quick information on how many subscribers are included in each list(s). The "My Lists" page should also allow you to create, delete, as well as view your list(s) health. You may also access the "Add Contacts to My Lists" page from here.


01. To go to the "My Lists" page you must first click on the "Contacts" tab, which should take you to the "Contacts" tab page. A dark blue bar should also appear just below the "Contacts" tab that you just clicked, and should give you more options; "Lists", "Add Contacts", "Browse Contacts", "Search Contacts", "Segments", "Sign-up Forms"
02. Clicking on the "Lists" option should take you to the "My Lists" page.
03. This is the part where all the information on list(s) name will be displayed. A quick count of the number of contacts will also be shown here, as well as the link for adding contacts, adding a "Welcome Message", delete list(s), and view list health.
04. This is the column where list(s) name are displayed.
05. The link to add a "Welcome Message" goes here.
06. On this part you should see a quick information on the number of subscribers, and the link to go to the "Add Contacts to My Lists" page.
07. If you would like to delete your list(s), you just need to look on this part of the page - you should see the "Delete" link. It is also beside the "Delete" link where you will see the "List Health" link, which should display the list health for you.
08. This is the button that you click to create a new list.


Saturday, March 22, 2014

Disclaimer


The information in and available from this website http://icontact-tutorials.blogspot.com/ ("iContact Tutorials") has been prepared and/or obtained for general information, education, and reference purposes only and is not intended to replace iContact's built-in Help and Knowledge Base systems. The iContact Tutorials website is not in any way affiliated with Vocus or iContact!

Transmission of any of the contents of "iContact Tutorials" to you, or your access and/or use of "iContact Tutorials" is not intended to, and does not replace Vocus or iContact's help database / knowledge base (the one that you access by clicking on the "Help" link on the upper part of your iContact account).

While every effort is made to ensure the correctness and completeness of the information contained herein, you acknowledge that "iContact Tutorials", its owners, administrators, contributors, and partners do not promise or guarantee that the information contained herein is correct, complete, or up-to-date. Vocus' iContact software is continually undergoing improvements and some particular issues may require the consideration of facts, policies and procedures that are not fully addressed in "iContact Tutorials". There is no guarantee that the information in "iContact Tutorials" is correct, complete, or up-to-date for any specific circumstance.

"iContact Tutorials" may link to other locations via the Internet, and there is no endorsement, guarantee or warranty made or implied with respect to the content and information available at another site, and "iContact Tutorials" does not monitor any linked sites or evaluate the propriety or correctness of any information available at a linked site.

If you need official iContact information, please use their official website which is http://www.icontact.com/, and the Knowledge Base within that site.


Wednesday, March 19, 2014

Search Contacts


The iContact Email Marketing software's "Search Contact" function is a convenient way to search for a specific email address. This feature is very straightforward that you just need to type in what you are looking for on the search field and click on the the "quicksearch" or "Search My Contacts" button.


01. To go to the "Search Contacts" page page you must first click on the "Contacts" tab, which should take you to the "Contacts" tab page. A dark blue bar should also appear just below the "Contacts" tab that you just clicked, and should give you more options; "Lists", "Add Contacts", "Browse Contacts", "Search Contacts", "Segments", "Sign-up Forms"
02. Clicking on this "Search Contact" option should take you to your iContact Email Marketing software's "Search My Contacts" page.
03. This portion is where you type in the email address (or words that may be part of email address) you want to search. The screenshot also show the "quicksearch" button.
04. This "browse all my contacts" button take you back to your "Browse Contacts" page should you need to do so.
05. This is the "Advanced Contact Search" part should you need more keywords that won't fit on the "Quick Contact Search" portion.
06. You may also search contacts based on when they were added on.
07. If you have some custom fields in your iContact account, you may also use them to limit your search.
08. Finally, the "Search My Contacts" button that you need to click should you need to take advantage of the "Advanced Contact Search".


Sign-up Forms


A sign-up form is something that you see on some websites where visitors can type in their email address, and in return they get to receive newsletters - so to say this is the most common scenario.


The iContact Email Marketing software "Sign-up Forms" page allows you to create fully functional sign-up forms that you can integrate with your HTML-based website(s), and Facebook Fan Pages.


01. This is the link that you need to click to take advantage of the features the "Contacts" tab contain.
02. Clicking this link should take you to your iContact Email Marketing software's "Create or Edit Sign-up Forms" page.
03. This portion "Social Tools Sign-up Forms" shows the Facebook sign-up form(s) that you have generated using your iContact Email Marketing software.
04. Facebook sign-up form name(s) appear on this portion.
05. This "Edit this Form" icon is indicated by a paper with a pencil on top, and will allow you to change the Facebook Fan Page where it will show up.
06. The magnifying glass icon would be your "Preview this Form" feature that allows you to have a glimpse on how your Facebook Fan Page sign-up form would look like in Facebook.
07. This trash bin icon is quite self-explanatory. This should allow you to delete one of your Facebook sign-up forms.
08. The "Create Facebook Form" button allows you to create a new Facebook sign-up form for you Facebook Fan Page(s).
09. This portion "HTML Sign-up Forms" shows the HTML sign-up form(s) that you have generated using your iContact Email Marketing software. The codes produced here can be used on HTML-based website(s). You may also use the codes on other non-HTML webpage platforms as long as you have some code converter or API.
10. HTML sign-up form name(s) appear on this portion.
11. This is where you check if the sign-up form would send a confirmation message to those who signed up for your newsletter, and this is also what you click on to add a confirmation message to your HTML sign-up form.
12. The "View HTML" allows you to view the source code of the sign up form genereated by your iContact Email Marketing software.
13. The "Delete" to wipe out your HTML sign-up form(s).
14. The "Create HTML Form" is what you click to have your iContact Email Marketing software generate HTML sign-up form(s) for you.


Browse Contacts


The iContact Email Marketing software's "Browse Contacts" feature is very straightforward. This function allows you to take a look on the email addresses included in your list(s). The "Browse Contacts" page should also allow you to edit each contact's profile and view their history. A contact's history contain information such as when the contact was added to list(s), sent messages, bounced messages, and so on. This page should also allow you to do certain functions like (or put the contacts to a certain status) "Copy", "Move", "Unsubscribe", "Delete", "Export", "Do not contact".


01. To go to the "Browse Contacts" page you must first click on the "Contacts" tab, which should take you to the "Contacts" tab page. A dark blue bar should also appear just below the "Contacts" tab that you just clicked, and should give you more options; "Lists", "Add Contacts", "Browse Contacts", "Search Contacts", "Segments", "Sign-up Forms"
02. Clicking on this "Browse Contacts" option should bring you to your iContact Email Marketing software's "Browse Contacts" page.
03. This portion provides you a drop down selection to choose which list(s) or segment(s) you want to browse.
04. This part should display some sort of summary about the total number of contacts you have in your account. How many of them are subscribed, got bounced, placed themselves in "Do Not Contact", and so on.
05. A convenient "display limiter" that allows you to set the number of contacts you want to iContact Email Marketing software to display for browsing. At the time of this writing, it gives you option to display 20, 50, 100, or 200 contacts at a time.
06. Just below the "display limiter", the contacts are display along with information such as first names, last names, the date they were added to the list you are browsing.
07. Left pane shows the email addresses of your contacts.
08. This is the icon for the "Edit Contact Profile". Clicking on this icon takes you to a page where you can modify your contacts' first name, last name, and so on.
09. This is the icon for the "View Contact History". Clicking on this icon takes you to a page where you see when your contacts were added, if they unsubscribed, and so on.
10. This part shows the "Actions" that you can do to your contacts' information.


Tuesday, March 18, 2014

The Contacts Tab


A number of cool features can be tapped when you access the "Contacts" tab. Features such as lists creation, contact search, adding contact(s) to one or more lists, segments creation and more. The "Contacts" tab is the second mostly clicked tab in your iContact Email Marketing Software.


You may access the "Contacts" tab by clicking on the upper part of your iContact Email Marketing Software where it shows "Contacts". This should be in between the "Home" and "Email" tabs.


01. This is the link that you need to click to take advantage of the features the "Contacts" tab contain.
02. The "My Lists" portion takes you to a page that would allow you to view or create list(s).
03. The "Add Contacts" takes you to that part in your iContact Email Marketing software that will allow you to upload your contacts' email addresses or create a sign-up form for your Facebook or HTML-based websites.
04. This "Search My Contacts" category allows you to go to that part in your iContact Email Marketing software to search for a specific email address by typing it on a search box, or browse the email addresses contained in your list(s).
05. "My Segments" would then allow you to go to a page where you can create or edit your iContact Email Marketing software segments. Segments are a powerful tool for targeting specific subscribers.
06. The dark-blue bar that gives you the options under the "Contacts" tab. As of this writing, it shows "Lists", "Add Contacts", "Browse Contacts", "Search Contacts", "Segments", "Sign-up Forms".


To wrap things up, the "Contacts" tab is what you will most likely access if you are doing these tasks:
  • Browse your list(s) and its respective contacts.
  • Create / edit / delete your list(s).
  • Create / edit / delete segments.
  • Create sign-up forms that you can use with your Facebook or HTML-based websites. Other platforms like WordPress would need a third party widget / API.
  • Edit your contacts' personal information such as first nasme, last names, and so on.
  • Search a contact by typing in their email address.
  • Upload the email addresses of your contacts to any list(s) of your preference.
  • View your contacts' history.

Thursday, March 13, 2014

Segments


The iContact "Segments" page is where you create your segments. Segments are a powerful tool for targeting specific subscribers. You use segments to create targeted lists based on subscriber data. For example, you would like to send different email messages / newsletters to your male and female contacts but all of them (male and female contacts) are in just one list. Let's say these are your contacts' email addresses:

Male ContactsFemale Contacts
abc@abc.comwxy@wxy.com
bcd@bcd.comxyz@xyz.com


If these email addresses are all contained in just 1 list, and (as mentioned above), to send a different email message for male contacts (abc@abc.com and bcd@bcd.com) and for female contacts (wxy@wxy.com and xyz@xyz.com) you can either create 2 separate lists and move them to the list that represent their genders or create some custom field and segments that will accomplish the task for you. This is just an overview on what you can expect from this cool iContact Email Marketing software feature.


The "My Segments" page can be accessed by clicking on the "Contacts" tab and choosing the "Segments" option that is located on the dark blue bar just below the "Contacts" tab, represented respectively by the 01 and 02 below.


01. The iContact Email Marketing Software "Contacts" tab.
02. The "Segments" option located on the dark blue bar just below the "Contacts" tab.
03. This is the part where you will see all the segments that you have created.
04. This "Create A New Segment" button is the one to click should you need to create a new segment.


Sunday, March 2, 2014

Adding Contacts To Your Lists


Now that you have created your list(s), it's time to add / upload your contacts. Your iContact Email Marketing software allows you to upload contacts one at a time or by group. Further, you may add contacts by group through copy and paste or by uploading / importing a file. At the time of this writing, your iContact Email Marketing software only accepts three file formats; CSV, XLS (not XLSX), and VCF. Sample files are provided for download at the end of this article so you won't have to do a trial and error on what fields to use for your contacts' database.


To add / upload your contacts the your list(s) in your iContact Email Marketing software, please follow these steps:
01. Click on the "Contacts" tab.
02. Click on the "Lists" option on the dark blue bar just below the "Contacts" tab. This should take you to the "My Lists" page.
03. Click on the "Add" link on the right part of the list where you want to add your contact(s). This should take you to your "Add Contacts to My Lists" page (the third screenshot shown below).


Another step to adding / uploading your contact(s) to your list(s) can be accomplished by following these steps:
01. Click on the "Contacts" tab.
02. Click on the "Add Contacts" option on the dark blue bar just below the "Contacts" tab. This should take you to a page with four rectangular sections categorized as "My Lists", "Add Contacts", "Search My Contacts", "My Segments".
03. From the "Add Contacts" category, you should be able to choose among these options; "Upload From File", "One at a Time", "Copy & Paste". From here, each option you choose should take you to these options' respective pages shown on screenshots 4, 5, and 6 below.


If you follow the steps from the first screenshot, your iContact Email Marketing software should take you to your "Add Contacts to My Lists" page (shown below). This page should give you three options on how you may want to upload / import your contacts:
01. Upload Contacts From a File. Choosing this takes you to the "Upload Contacts" page. Should be the 6th screenshot on this article.
02. Add Contacts One by One. This option takes you to your iContact Email Marketing software's "Add One Contact" page, and that should be the 4th screenshot in this article.
03. Copy & Paste Contacts. Choose this option and you should see your "Copy & Paste Contacts" screen, which should be the 5th screenshot in this article.


This "Add One Contact" option allows you to upload / import one email address along some associated information such as the first name, last name, address, phone, and so on.
01. This is the field where you type in the email address you want to add. This field is required.
02. This is the part where you put check(s) on the checkbox(es) on the list where you want to associate the email address you are trying to add.
03. These are the optional fields where you can type in those information associated to the contact you are trying to add.
04. Check this checkbox if you would like iContact to send the contact you are trying to add a "Confirmation Message". More information about "Confirmation Message" is found in a separate article.
05. Once you are sure that every information you have typed in are all correct, you may now click on this "Add Contact" button to add your contact.


In iContact's "Copy & Paste Contacts" page, you can conveniently just copy or cut and paste email addresses from a text or excel spreadsheet file. This option was designed so that even if you have a text file that contain texts that looked like this: "Henry Ford founded the Ford Motor Company and his email address is henry.ford@ford.com. He was married to Clara Jane Bryant. Clara's email address is cjb@ford.com, and so on..."
If you copy or cut and paste such message construction above, the system should detect and upload / import the email addresses from the article which are henry.ford@ford.com and cjb@ford.com. The drawback of this feature is that it has no option for you to type in other information such as the first names, last names, or other necessary information regarding the contact(s).
01. This is the part where you put check(s) on the checkbox(es) on the list where you want to associate the email address you are trying to add.
02. This is area where you paste the above-mentioned texts. Your iContact Email Marketing software will detect the email addresses in a group of texts you have pasted.
03. Check this checkbox if you would like iContact to send the contact you are trying to add a "Confirmation Message". More information about "Confirmation Message" is found in a separate article.
04. Once you are sure that every information you have typed in are all correct, you may now click on this "Add Contact" button to add your contact.


Choosing the "Upload From File" option should bring you this screen. From here you should be able to import / upload your contacts as long as the format is one of the three accepted file formats mentioned earlier in this article.
01. This is the part where you put check(s) on the checkbox(es) on the list where you want to associate the email address you are trying to add.
02. Click on the "Choose File" button and you should be able to search the file you want to import / upload from your computer to your iContact Email Marketing software.
03. Check this checkbox if you would like iContact to send the contact you are trying to add a "Confirmation Message". More information about "Confirmation Message" is found in a separate article.
04. Click on the "Upload Contacts" button once you have finalized your choices from steps 01, 02, and 03.
05. This will be your "Upload History", which should show you the number of contacts you have uploaded when you first started using your iContact Email Marketing software. A "complete" would mean a successful upload, while a "noaction" would mean a failed upload.


The iContact Tutorials Admin team suggests that you use the XLS file format when uploading / importing contacts. Below are sample files that you can download so you would know how the headers are arranged.

XLS Format Sample FileCSV Format Sample FileVCF Format Sample File


If you are curious about VCF files you may want to check a website called: http://vcardmaker.com/. This website is not in any way associated with iContact Tutorials.


iContact Tutorials Copyright © 2014 -- Based on design by O Pregador